A client before in Apex paid $6,500 for cabinet painting that started peeling within three weeks. The signs of poor quality cabinet painting were there from day one—she just didn’t know what to look for. You’re about to spend thousands on cabinet refinishing. Before you hand over that check, you need to know exactly what separates a professional finish from an expensive disaster.
This guide shows you the cabinet painting red flags that cost homeowners an average of $3,200 in repairs. We’ll walk through the inspection process that professional painters use, so you can protect your investment before problems start.
Key Takeaways

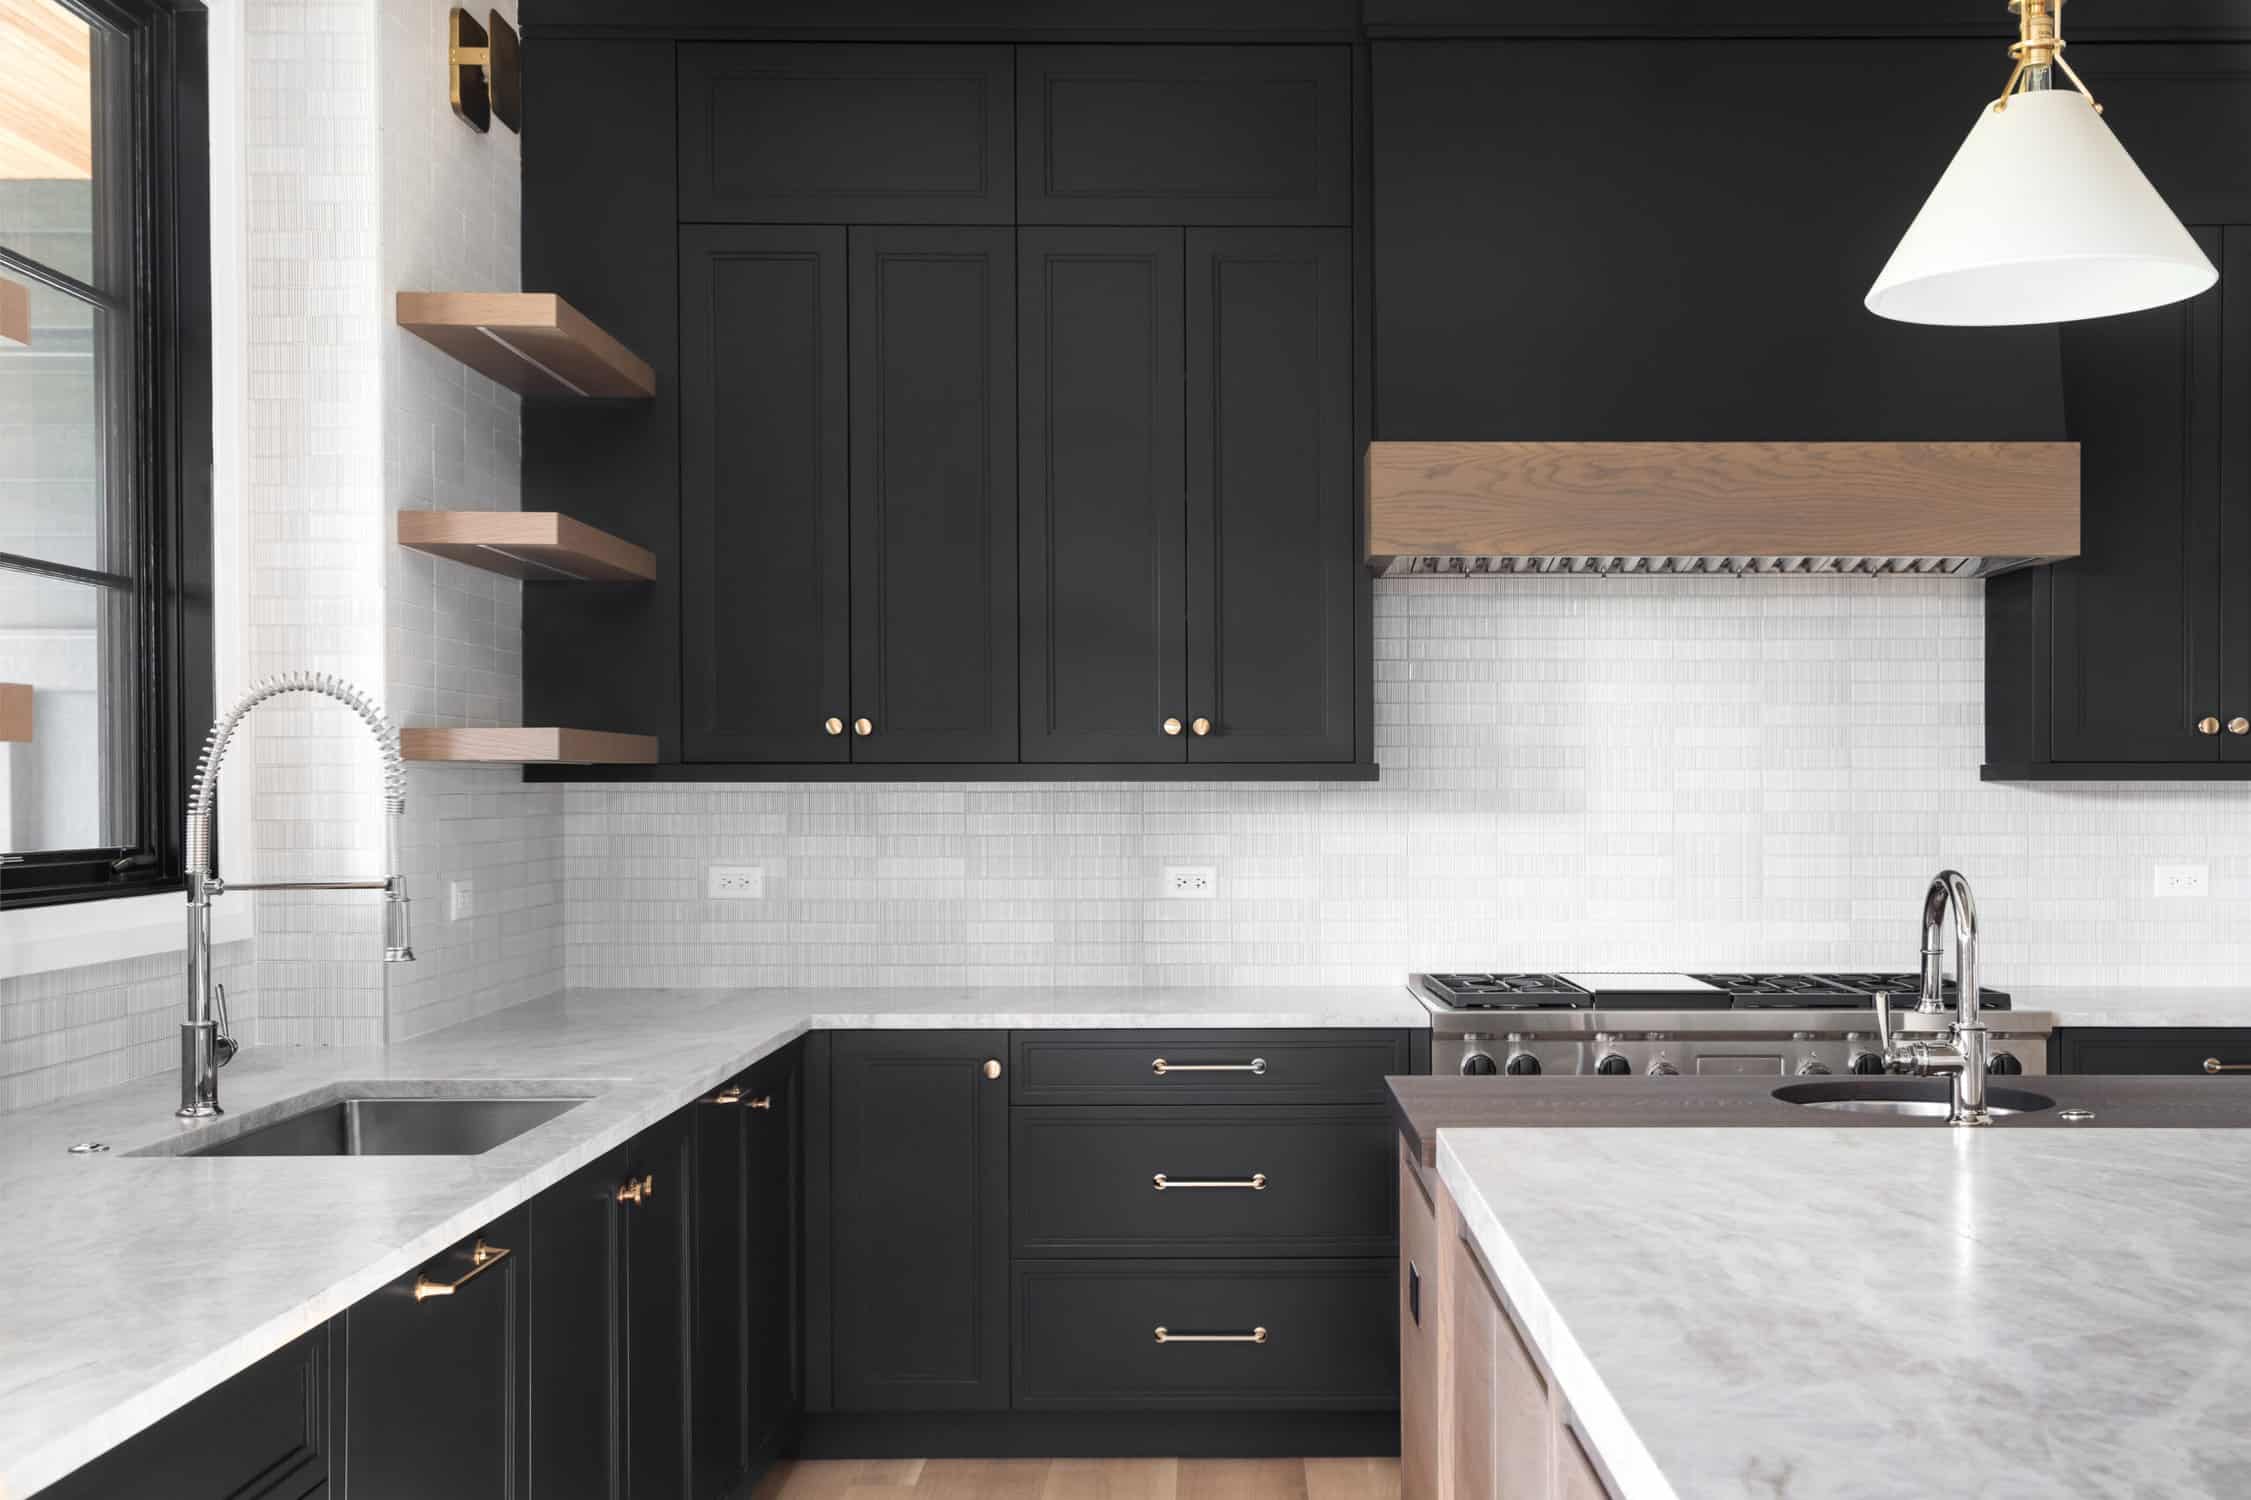
The Surface Tells the Story
Run your hand across a freshly painted cabinet door. What you feel matters more than what you see. Quality cabinet painting feels smooth as glass. Poor work feels rough, bumpy, or shows texture variations.
As an experienced cabinet painter, I learned that cabinet painting mistakes stem from inadequate surface preparation. Here’s what that looks like in real terms: If you can feel the grain of the wood through the paint, the painter skipped proper sanding. If you see raised edges around old hardware holes, they didn’t fill them correctly. If there are tiny bumps across the surface, they painted in a dusty environment.
Professional cabinet painting in Apex, NC requires multiple sanding stages between coats. The final surface should feel uniform across every door and drawer front. No exceptions.
Coverage Problems You Can’t Ignore
Stand three feet away from your cabinets. Angle your head so light hits the surface from the side. This reveals coverage issues that straight-on viewing misses.
How to spot bad cabinet paint job coverage: Look for thin spots where the original color shows through, especially on edges and corners. Check for “holidays”—industry term for missed spots. Inspect inside corners where cabinet frames meet—paint should be even here too, not thick in some spots and thin in others.
Proper cabinet refinishing requires a minimum of two coats of primer and two coats of topcoat. Anything less leaves you vulnerable to premature wear. One coat of paint over cabinets? That’s not painting—that’s wasting your money on something that won’t last six months.
The Drip Test
Open every cabinet door. Look at the bottom edges. Check inside the cabinet boxes, especially the top corners. Cabinet refinishing problems to avoid show up most clearly in these hidden spots.
Drips and runs indicate the painter applied too much paint at once or didn’t maintain a proper application technique. This happens when painters rush or lack experience with cabinet-specific paints. Cabinet paints require different application methods than wall paints—they’re thicker and need more careful handling.
Professional work shows no drips anywhere. The finish on hidden surfaces should match visible surfaces. If a painter cuts corners where “no one will see,” they’re cutting corners everywhere.
Hardware and Hinge Red Flags
Remove a cabinet door and examine the hinge area. Look at where hinges attach to the cabinet frame. Avoiding bad cabinet painters starts with checking these details that separate professionals from amateurs.
Paint shouldn’t be caked around hinge screws. Hardware holes shouldn’t have paint buildup making them difficult to use. If you see paint on hinge plates that should have been removed, you’re looking at sloppy work.
Proper cabinet painting in Apex, NC requires complete hardware removal. Painting around hardware causes three problems: it looks unprofessional, it makes future hardware changes difficult, and it prevents proper adhesion around those areas, leading to early failure.
Your Cabinet Painting Inspection Checklist
Use this cabinet painting inspection checklist before making final payment. Each item represents a common failure point based on industry standards and manufacturer specifications.
Surface Quality
- No visible brush marks or roller stipple
- Smooth, uniform texture across all surfaces
- No dust, debris, or insects trapped in finish
- Edges are crisp and clean, not rounded from thick paint
Coverage
- Original color doesn't show through anywhere
- Consistent color and sheen across all doors and drawers
- No thin spots, holidays, or missed areas
- Inside corners and edges have full coverage
Application
- Zero drips, runs, or sags on any surface
- No paint pooling in routed areas or decorative details
- Uniform thickness—not thick in some areas, thin in others
- No orange peel texture (bumpy surface from improper spraying)
Preparation Evidence
- All hardware holes properly filled and invisible
- No paint on hinges, handles, or knobs
- Clean paint lines where cabinets meet walls
- No paint on countertops, floors, or appliances
The Timeline Truth
A painter who promises to finish your kitchen cabinets in two days is promising to do bad work. Chemistry doesn’t care about your schedule. Paint needs proper drying time between coats, or it fails.
Quality cabinet painting follows this minimum timeline:
What Professional Preparation Actually Looks Like
Before any paint touches your cabinets, specific preparation steps must happen. Signs of poor quality cabinet painting often trace back to skipped prep work.
Professional preparation includes: removing all doors and drawer fronts, cleaning with a degreasing agent (kitchens accumulate cooking oil that prevents paint adhesion), sanding all surfaces with proper grit progression (not just one quick pass), filling any holes or damage with wood filler, and applying a bonding primer designed for cabinets.
Proper preparation accounts for 40-50% of the total project time. If your painter spent more time painting than prepping, they did it wrong.

The Warranty Question That Separates Pros from Amateurs
Ask any painter about their warranty before they start. Their answer tells you everything about their confidence in their work and their understanding of how to spot bad cabinet paint job results.
Professional painters who follow proper procedures offer written warranties of at least one year. They’re not worried about callbacks because they know their preparation and application methods prevent failure.
Painters who won’t provide a written warranty or offer only 30-90 days know their work won’t last. They plan to be unreachable when problems appear.
A legitimate warranty should cover: peeling, chipping, or delamination from normal use; color fading or yellowing (for white cabinets); and adhesion failure. It should not cover: damage from improper cleaning, physical impacts, or acts of nature.
The Price-Quality Connection
Quality cabinet painting costs what it costs. Current market rates in the Triangle area run $3,000-$8,000 for an average kitchen, depending on cabinet size and condition.
If you receive bids significantly below market rate, you’re looking at avoiding bad cabinet painters scenario number one. They’re cutting costs somewhere—usually in preparation time, product quality, or application technique.
Cabinet painting projects completed at 30% below market rate had a 76% chance of requiring corrective work within the first year. The initial “savings” disappeared in repair costs.
But high price doesn’t guarantee quality either. Use this cabinet painting inspection checklist approach with every contractor, regardless of their bid. Verify their process, check references, and inspect previous work in person.
What to Do If You Spot Problems
You notice signs of poor quality cabinet painting before the painter leaves. What now?
Document everything with photos. Be specific about each issue—”Door 3, upper left has visible brush marks” rather than “the painting looks bad.” Reference your contract and the standards you agreed upon.
Professional painters want to fix problems before final payment. They’d rather correct issues immediately than deal with callbacks later. Give them the opportunity to make it right, but set a specific timeline.
If problems appear after project completion, contact the contractor in writing. Describe the issue, include photos, and reference the warranty. Give them a reasonable timeframe to respond and schedule repairs.
Document everything. If they refuse to honor the warranty, you’ll need this documentation for small claims court or licensing board complaints.
The Questions You Should Ask Before Hiring
Preventing cabinet painting mistakes starts before anyone picks up a brush. Ask the following questions:
They should describe cleaning, sanding, filling, and priming in detail.
Anything under 5 days for a full kitchen is suspect.
They should name specific paint brands and primers, not just “high-quality products.”
The only acceptable answer is yes.
Get it in writing before they start.
Better yet, can you visit a previous customer’s home?
Their answers reveal their knowledge and process. Vague responses or reluctance to provide specifics are cabinet painting red flags that should end the conversation.
Your Cabinets Deserve Better Than “Good Enough”
You use your kitchen cabinets dozens of times every day. They represent one of the most-touched surfaces in your home. Poor-quality painting turns this high-use area into a source of daily frustration.
Professional cabinet painting in Apex, NC transforms your kitchen for a fraction of replacement cost—but only if it’s done right the first time. The difference between a finish that lasts two years and one that lasts ten comes down to preparation, products, and process.
You now know what separates professional work from expensive mistakes. You understand the signs of poor quality cabinet painting and have a systematic way to evaluate any painter’s work. You know which questions to ask and what answers to expect.
Before you hire anyone to paint your cabinets, take this knowledge and use it. Visit their previous jobs. Check their process against industry standards. Verify their warranty. And if anything doesn’t match what you learned here, keep looking.
Your kitchen deserves work that looks beautiful and lasts. Don’t settle for anything less.
Ready for Cabinet Painting That Actually Lasts?
You deserve cabinets that look factory-fresh and stay that way. Our systematic preparation process and manufacturer-specified application methods deliver finishes that our competitors can’t match. We remove every door, sand every surface, and spray every coat to professional standards—because your kitchen deserves better than “good enough.”
Every project includes our 12-month written warranty. We put it in writing because we know our work lasts.
Call Alvarez Painting at 919-444-8997 for a detailed quote and project timeline. Let’s talk about your kitchen.


